How to Write a dbt Model in SQL: Examples & Best Practices
dbt is a tool that allows us to design, implement, and test workflows for the creation and population of data models. It solves common pain points in data model implementation such as lack of standardization, complicated dependency management, and repetitive code. It integrates smoothly with popular cloud data warehouses such as Google Cloud BigQuery, Snowflake, and AWS Redshift. Some of its best features include auto-generated documentation, generic and custom tests, and Jinja templating for macros and models.
The auto-generated documentation is comprehensive and includes a visual representation of the data lineage. Custom and generic tests can also be leveraged to make the QA process much more efficient than traditional tests that are manually written and triggered. Finally, Jinja is a templating script that can be combined with SQL to create reusable functions. It is quite flexible because it is parameter based. It is also able to take environment variables–a useful feature for when engineers need to deploy dbt in containers.
dbt includes several elements such as sources, seeds, snapshots, and metrics. The most important of them all is the dbt model.
dbt Models
A data model is an organized design of how the data of entities in a database are related to each other. Some examples of common data model architectures are Data Vault and Data Mesh. A dbt model can be thought of as a blueprint of a table or view that represents entities in a database. It is written using SQL and Jinja. Dependencies and transformations are typically written here.
Traditional implementation involves a lot of work because stored procedures and DML/DDL statements have to be created for each table, view, and process. That means a lot of repetition. Over time, changes will inevitably need to be applied such as schema or transformation logic changes. These are also difficult to do for large models and systems because engineers have to go over everything again.
How to build a dbt model
Imagine that a retail company would like to migrate its Point-of-Sales data from its legacy system to the cloud. Your team is tasked with creating a Proof-of-Concept to demonstrate to the client that a data warehouse is possible. You floated the idea of using dbt to implement the data model. The client is reluctant to use a non-traditional tool so they ask for a quick demonstration. You agree, and show them step-by-step how it is done.
First, your data modeler came up with a simple data model: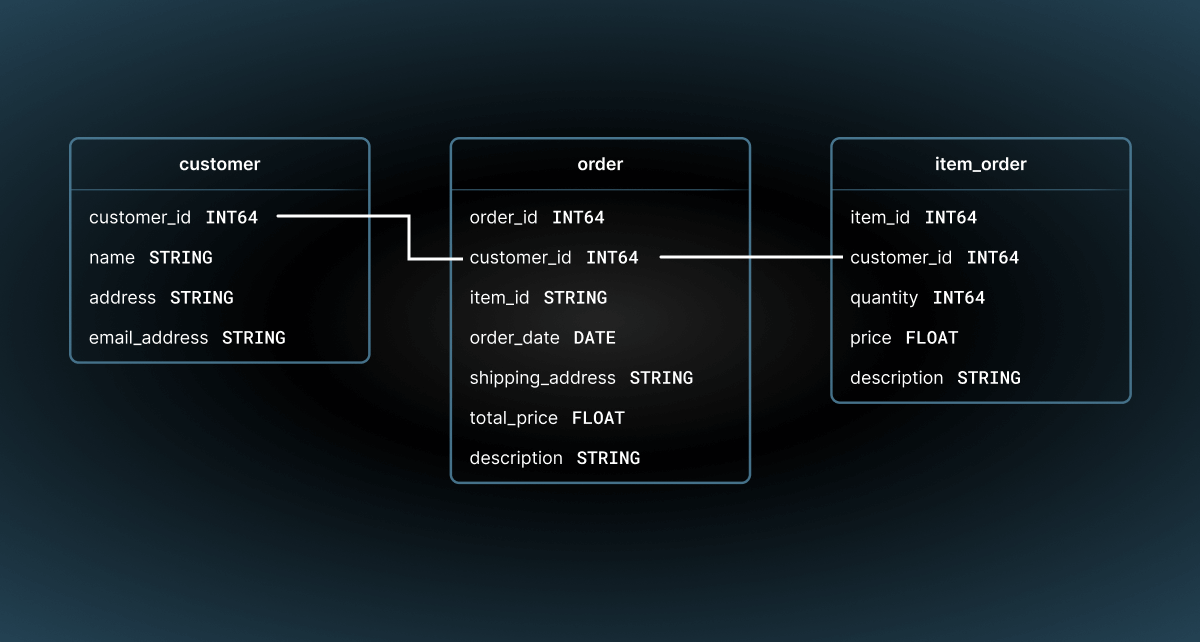
As the data engineer, you are tasked with using dbt to generate the models based on the above schematic. Here is a summary of the steps to achieve this goal:
- Initialize the dbt project
- Write model files
- Generate documentation
- Orchestrate the workflows
A fully completed data model can be thought of as a structure. Therefore, we can think of the elements of the data model as parts of a structure.
Initializing a dbt project
Before starting, you need to install dbt using pip or homebrew. Once done, you should also install the necessary dbt package for your data platform such as Redshift, BigQuery, or Snowflake. Next, you must set up your profiles.yml by providing pertinent connection details.
For example, if your data warehouse is on BigQuery, here is the series of commands you will need:
pip install dbt-corepip install dbt-bigquery
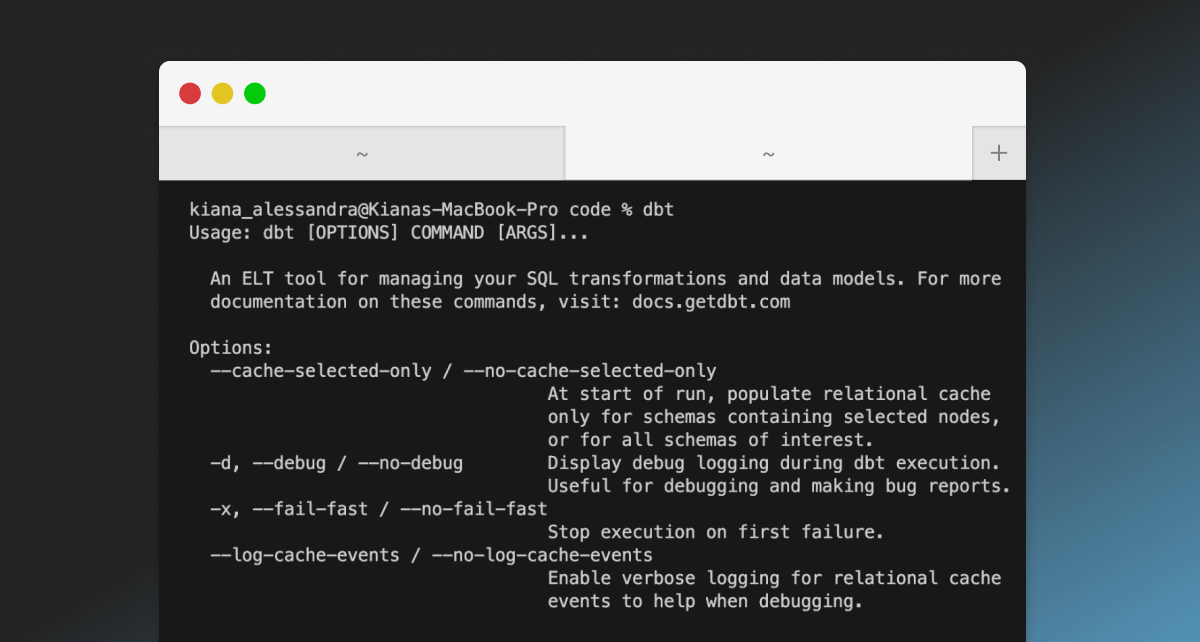
You will know that dbt is installed by running dbt and seeing the following output:
After which, you can get started on your project by running dbt init. It will generate a base template for your project. The base template can be considered the foundation of the “structure” we are trying to build. We can later add in more features and flesh out the structure to come up with the final product.
You will then be asked the following details:
- Project name
- Database adapter (BigQuery, Snowflake, Redshift, etc.)
- Authentication method (OAuth or Service account)
- Project id (name of the project within the cloud platform)
- Dataset id
- Threads (number of concurrent threads)
- Timeout in seconds (default is 300)
- Region (US, EU, etc.)
Then, a new folder with the Project name you supplied earlier will be created. It will contain the following directory structure:
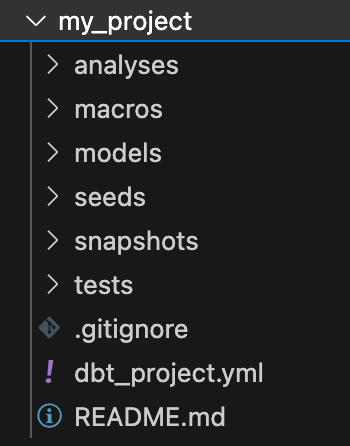
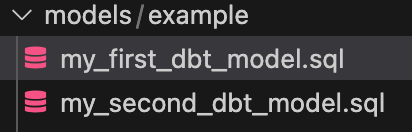
You will notice that you already have sample files ready to use. For instance, if you peek into the “model” folder, you will see the following:
You can immediately use the dbt run command on your terminal and it will generate the correct tables, provided your profiles.yml is configured correctly and the source data is ready. However, these models are not what we want for this use case. Meaning, we will have to write our own model files.
Writing model files
Models can be thought of as the building blocks needed to build a structure. Without them, the house will not stand. From a technical standpoint, a model file is a SQL SELECT statement. However, note that we can use CTEs to perform transformations on data. The first thing to do is to define our base tables. Our base tables should source from the raw source data that should also be present in the data warehouse.
Remember that we are creating a POC for a retail company–so that means that in general, the schema will typically look like this the following. In practice, the schemas will have slight variations depending on the company.
Customer source table:
| Column name   | Data type |
|---------------|-----------|
| customer_id   | INT64     |
| first_name    | STRING    |
| last_name     | STRING    |
| house_number  | INT64     |
| street        | STRING    |
| city          | STRING    |
| email_address | STRING    |
Item order source table:
| Column name | Data type |
|-------------|-----------|
| item_id     | INT64     |
| quantity    | INT64     |
| price       | FLOAT     |
| description | STRING    |
Each source table corresponds to a base table. Meaning, we will have 2 base tables. To write the model files for each, we do the following:
Set configuration options
The small details in a structure such as the wallpaper and flooring need to be considered as well. We can think of those small details as the configuration options. Configuration options can be set either within the model file itself or in the dbt_project.yml file. This file contains various options to do the following: set paths, define start and end behavior, define project variables, and more. To see a list of all available options, please see this link.
In the context of a model, we can configure the following:
- Materialization – whether the model is a materialized view, incremental model, or a table.
- Schema - A schema in dbt refers to the fully qualified path of the model in the data warehouse. The path usually consists of a dataset name and table name.
- Tags - These can be used to organize dbt workflows. For example, models can be tagged with “staging”, “dev”, or “prod” and you can trigger dbt to run only for certain tags.
Your schema configuration should be placed at the top of the model file like so:
{{ config(
   materialized="view",
   schema="staging"
) }}
Define the SQL statement
Let’s start with customers.sql by defining the source data as follows. It’s as simple as selecting all the columns.
WITH source AS (
   SELECT
       customer_id,
       first_name,
       last_name,
       house_number,
       street,
       city,
       email_address
   FROM source_table
)
Notice that the columns related to name and address are separated in the source table. We will apply basic transforms to consolidate this data. We simply CONCAT the first_name and last_name columns to form the name column. We do the same with house_number, street, and city to produce the address column.
, transformed AS (
   SELECT
       customer_id,
       CONCAT(first_name, ' ', last_name) as name,
       CONCAT(CAST(house_number AS STRING), ' ', street, city) AS address,
       email_address
   FROM source
)
SELECT
   *
FROM transformed
And that’s it! We have completed customers.sql.
We follow the same process for item_orders.sql:
{{ config(
   materialized="table",
   schema="staging"
) }}
WITH source AS (
   SELECT
       item_id,
       quantity,
       price,
       description
   FROM source_table
)
SELECT
   *
FROM source
Note that this is a lot simpler because we do not need to apply any transformations.
Referencing models
Not all models are base models the same way not all building blocks stand alone. In practice, we want to create models that are derivations of other models the same way we expect to connect blocks together to form a structure.
We can do that by using the following syntax:
{{ ref("name of model") }}Another way to define models and variables, in general, is to use environment variables. dbt is able to parse these with the following syntax:
"{{ env_var('DBT_MY_VAR') }}"Our goal is to create the order model – and it is derived from both customers and item_orders. To do that, we first create the CTEs to pull data from both base tables. Then, we do an INNER JOIN on customer_id and produce total_price by multiplying quantity and price.
Then, we want to aggregate on total_price to come up with the total for each order. Finally, we apply the MD5 hash function on customer_id, total_price, and order_date to produce a unique order_id.
{{ config(
   materialized="view",
   schema="staging"
) }}
WITH customers AS (
   SELECT
       *
   FROM {{ ref("customers") }}
), item_orders AS (
   SELECT
       *
   FROM {{ ref("item_orders") }}
), individual_orders AS (
   SELECT
       c.customer_id as customer_id,
       i.item_id as item_id,
       CURRENT_TIMESTAMP() as order_date,
       c.address as shipping_address,
       SAFE_MULTIPLY(i.quantity, i.price) as total_price,
   FROM customers c
   INNER JOIN item_orders i
   ON c.customer_id = i.customer_id
), aggregated_orders AS (
   SELECT
       customer_id,
       order_date,
       shipping_address
       SUM(total_price) AS total_price,
   FROM individual_orders
   GROUP BY customer_id, order_date, shipping_address
), final_orders AS (
   SELECT
       MD5(customer_id, order_date, total_price) as order_id,
       customer_id,
       order_date,
       shipping_address,
       total_price
   FROM aggregated_orders
)
SELECT
   *
FROM final_orders
By now you might have noticed the unique syntax for references and configurations. The double brackets {{ … }} are actually a form of Jinja scripting. Using Jinja, we have the freedom to define macros. Macros can be thought of as reusable functions.
dbt model documentation
All structures have blueprints that contractors can refer to when they want to make additions, repairs, or alterations. This is similar to how all codebases have documentation to help present and future developers understand the ecosystem. Without documentation, developers will have to figure out things that have already been figured out before–making everything much more inefficient.
The command to generate documentation is dbt docs generate. It will create html files and place them in the target folder. Then, use dbt serve to start serving your documentation website locally on port 8080.
The documentation dashboard looks like this:
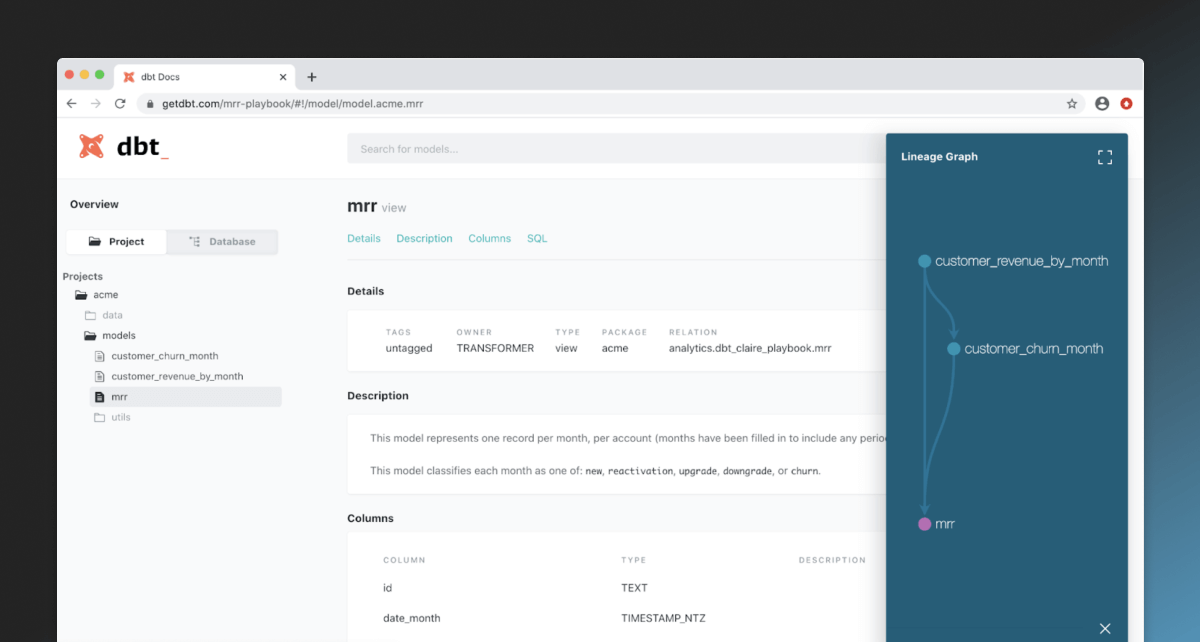
It contains a visual representation of the data lineage and pertinent details for all models. It is useful for keeping on top of all changes being made by various subteams on the codebase.
Orchestration
Running dbt locally is easy enough but eventually, we will want to take our work to production. In production, we can’t necessarily run everything manually so we will have to find ways to automate our workflows. To do that, we have several options:
- Using Apache Airflow
- CI/CD
- Webhooks on dbt Cloud
- Databricks
Out of all these options, the most commonly used option is CI/CD. This is because CI/CD pipelines are highly customizable DAGs. Imagine that you have a 20-man team and there are PR’s being opened left and right. It is very likely that the tech leads are spending all their time reviewing PRs instead of doing other meaningful work.
CI/CD pipelines can help speed up the process by running lint and unit tests automatically to tick off all the essential checks. By the time the PR falls onto the plate of a tech lead, they can skip the basic checks and go straight to optimization pointers.
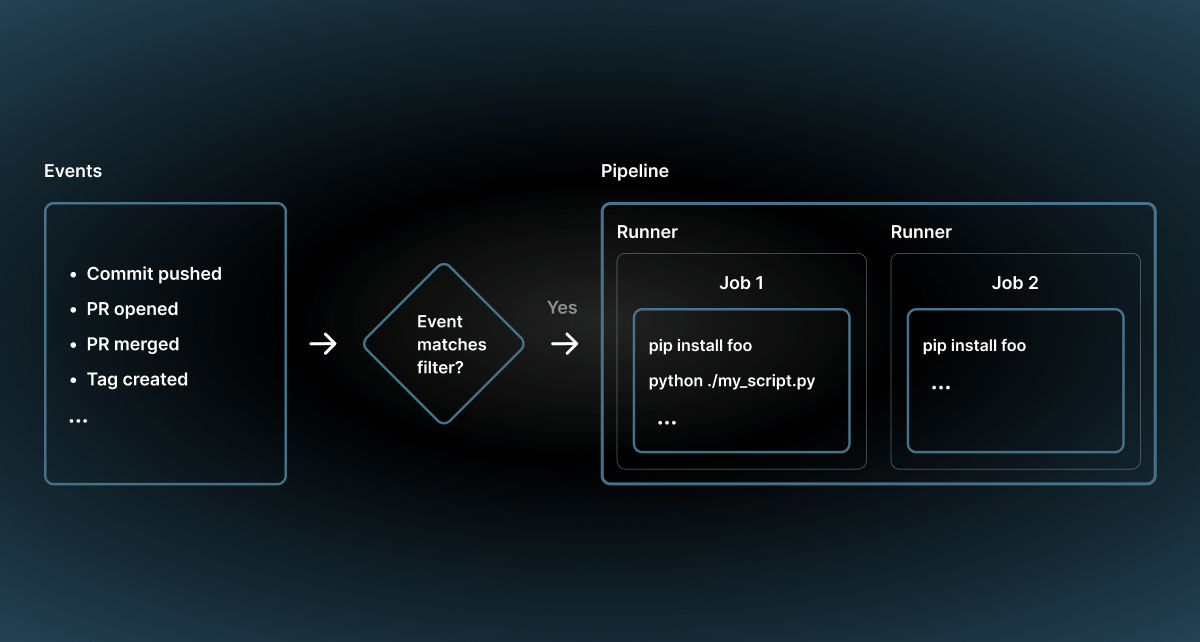
A pipeline diagram looks like this:
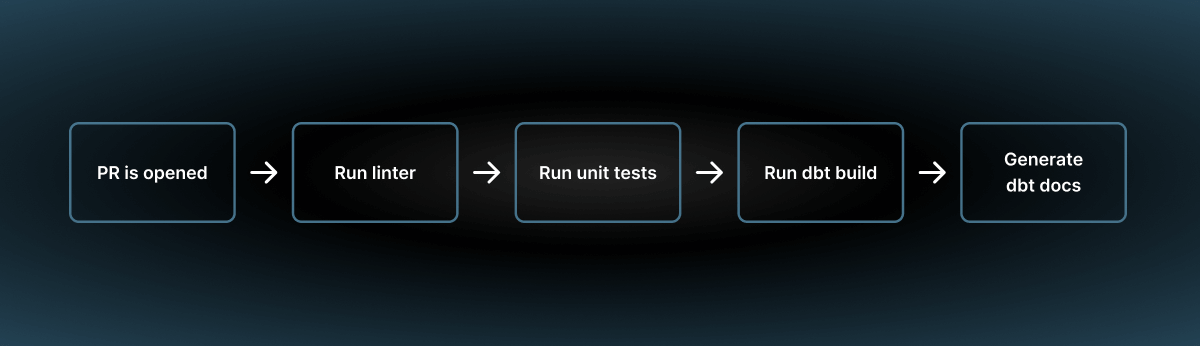
So, a sample pipeline run with dbt could look like this:
Conclusion
dbt is a tool that allows us to design, implement, and test data model workflows. One of its building blocks is the model. A dbt model is a representation of a table or view in the data model. To write a model, we use a SQL SELECT statement. Here, we can apply use CTEs (Common Table Expressions) and apply transforms using SQL. Additionally, we can document and test our models using the dbt docs generate, dbt docs serve, and dbt test commands.
